
Quick Links
Against all odds, you and whatever remaining crew that are left have made it to Act Three of The Alters. As you’d expect, you’re not out of the woods yet. Still, if you’ve made it this far, you have what it takes to see this one through.
Related
10 Best Games Like The Alters
Base building, survival, and management fans unite.
Act Two of the game ended with our band of alters splitting off into two separate factions. You’ll have to deal with these rebels sooner or later, but we do have a couple of other things to handle first. Once again, you have another Journey to go on between acts as the base rolls towards its next destination.
You’ll also have to navigate a section named Interlude, which is at least the second trippiest sequence in all of The Alters.
I’ve run this act of the game multiple times to prepare to get you best equipped for what’s to come, so let’s take a look at how to finally get you and your alters off of this godforsaken space rock once and for all.
Your choice of cure does change things slightly in Act 3, but not tremendously. Most quests still function about the same, with a couple of key differences here and there that I’ll point out as they come up.
Journey 3

You’ll wake up to the Scientist’s friendly face regardless of your chosen cure from Act 2. The remaining crew has rescued you, but you’re now rolling around aimlessly in a storm (a great use of resources). The Technician stole the TUR vehicle and bounced, along with any other alters you ticked off enough with your decisions as captain.
Head to the Comms Room and check your messages. These will play out differently depending on your choices so far, but all lead to the same roads anyway.

Talk to the Scientist again, along with anyone else on base, just to check in on how they’re feeling. Again, your available alters will be different based on how things have unfolded so far.
Now is a great time to repair broken modules if you have any repair kits in storage. You can’t craft during any Journeys, but the game still lets you repair. This is the perfect chance, since there’s also no ticking clock in this section of the game. You can take as much time as you need to repair everything you can.

Next, head to the womb and let the Scientist plug you into the Quantum Computer. It’s time to see if you can find any answers to your current situation deep inside your own psyche.
Interlude
Welcome to the first and only Interlude section of The Alters. This one is super straightforward. Simply run down the paths, following the vanishing figures and random items along the way.

A man called the Stranger will periodically interrupt you during some conversations. None of your dialogue choices matter here, so role-play as you see fit for your Jan.
The only thing to note is you’ll eventually reach a circle of landing pods full of the original dead or dying crew members. You’ll need to interact with the OG captain’s pod on the left side of the circle, talk to the Stranger once more, then interact with the 2001: A Space Odyssey-style obelisk at the center of the pods.

When you wake up, talk to the Scientist, and you’ll devise a plan to set the base for light tracking, hopefully allowing you to track the TUR vehicle housing the Technician and the rest of the team. Head to the Command Center and interact with the screen on the right (like you’re launching the base again), and you’ll be on your way to Act 3 proper.
Act 3 – Main Objectives

Step one is simply to call whoever you’re still working with back on Earth to come up with a plan. You’re at the extraction point, so that’s priority #1 regardless of everything else.
The Way Back

Your point of contact will instruct you to build a beacon for the rescue team to track. It costs 50 metals and 50 minerals. If you already have these resources on hand, craft it immediately.
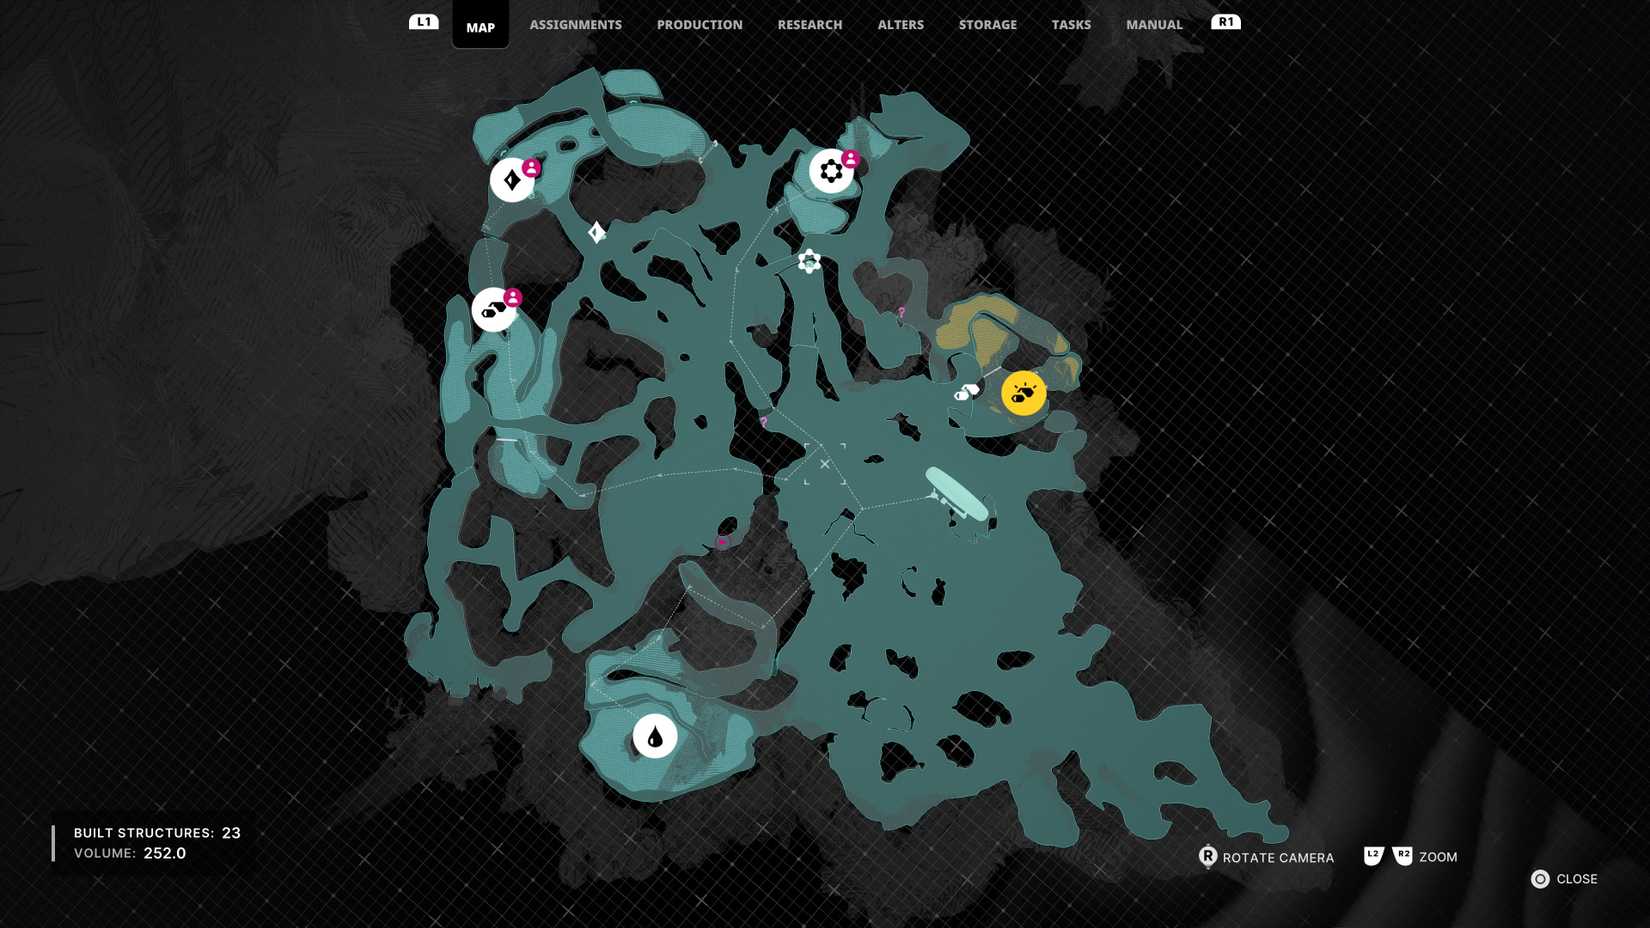
If not, you’ll need to get out into the hostile world of Act 3 and sink back into your mining routine. For your convenience, the picture above shows all five possible mining spots on the planet, one for each resource type.
Unlike Act 2, where there were multiple mines for each resource, Act 3 just has one of each to make things a little bit simpler.
There’s typically not an easy Point A to Point B for your pylon routing in this Act. Note my pylon placement in the picture above as well. You’ll often have to place a pylon on a cliffside, then go back to the ground below in order to find the right angle to chain everything together. Caves and small openings make direct pylon routing impossible, so you need to get more creative.

Pay special mind to the new type of anomaly in this area too, the Prism. This anomaly isn’t radioactive, but you need to go inside it in order to get rid of it. The first time this happens, there’s nothing you can do about it. You’ll need to experience it, then talk to the Scientist about your discovery.

He’ll explain that the Prism likely has weak points inside of it that you can target. Typically, there are three, and they look like the glowing orbs in the picture above. Once all three have been destroyed, the Prism anomaly will stop getting in your way.
The Prism anomalies are typically blocking a resource mine or other point of interest, so you’ll need to take them out. Additionally, look out for all the other regular anomalies in Act 3 as well. They’re absolutely everywhere, and much more aggressive. Don’t waste time passing out from radiation, and consider researching the anomaly shield for extra protection.
Once crafted, the beacon goes at the furthest point on the map left when facing away from the base. The location is a tall cliff that overlooks the rolling ocean below. Flip the beacon on, and you’ll see that it’s being blocked by a force field in the sky.
Check in with the scientist to see what you can do about this.
You’ll also have a couple of phone calls in the Comms Room before this objective is cleared. Answer the calls and respond as you please.
The Aftermath

While you’re already pretty freaking busy trying to simply get off the planet, you’re also going to want to track down the rebel alters if you want some more hands on deck for this final process.

Look for a weird, giant, glowing tree stump on the horizon. This is where the rebels are holed up. The map above pinpoints their exact location.
You may need to drill through some fallen rocks on your path to meet the rebels, so have some spare drill cartridges on standby.
The Technician is still mad and won’t want to come home, but you can craft a supply package for him since this makeshift, outdoor base is clearly struggling. The package costs 120 metals, 60 minerals, and 50 organics, so craft it once you have all that on hand.
Once it’s done, you’ll need to hand-deliver it back to the Technician. Here’s where things can veer off in one of two different ways.

If you opted for Lena’s brain implant cure, the Technician and the rest of the deserters can be swayed to come back to the base. All he’ll ask is for a promise from Lena that they’ll be okay once they’re back on earth. Talk to Lena, get her promise, then return to tell the Technician the good news. He and the others will now be back on the base and can be assigned to tasks again.
Any life lessons you’ve learned to this point that have opened new dialogue options are almost always the correct choice to get something to go your way. If you have any new prompts during this conversation, use them.
The Longest Day
If you choose the Tabula Rasa brain harvesting route, the Technician still won’t come back. He will, however, ask you to connect his outpost’s lone pylon to the main base. The pylon is on a cliff in the picture above. Get as close as you can to it, place your own pylon on the ground, then route it back to your closest available pylon that’s already deployed at one of your mines.
After this, you can also do one last good deed and hook the rebels up with some additional resources for survival. They’ll need 120 metals, 80 minerals, and 40 rapidium. Deliver these to the Technician once they’re gathered.
Sadly, this won’t convince him to come back, but it may sway some of the others. For me, this meant that the Refiner came back aboard the base after all my efforts to help. The Technician, Doctor, and Botanist still stayed behind. Wish them luck. You’ve done all you could.
Pay special attention to any alters you convince to come back. They’ll still be in really bad moods and will take some extra TLC to get back into good graces with them. Movie nights and beer pong matches are highly recommended.
Sky’s The Limit

Next, you’ll need to research the Beacon Blockade to figure out what this barrier in the sky is. Put the Scientist on it ASAP. It’ll take him 10 hours. As you’d expect by now, speak with him once the research is completed.
The plan is to summon a giant Interal structure that the Scientist believes is hiding beneath the planet’s surface. Or hovering in the air. Or something. Whatever is going on, he needs some more data.
Found at the three points of the map above are special, glowing anomalies that the Scientist needs you to harvest. They work the same as any other anomaly cores. Use your Luminator, and be extra cautious of any aggressive anomalies in the area that you need to take out along the way.

After this is done, there’s more to research. Assign the Scientist in the research “Mission” tab to the Materializer module. This takes 10 hours once again.

He’ll also have a plan to use something called a Fragmenting Device, which is now in your Workshop items. Craft it for 50 metals, 50 minerals, and 100 rapidium once you’ve gathered enough of everything.

Once his research is done, you’ll be able to build the Materializer module, as long as you have 20 metals, 40 minerals, and 30 rapidium on hand. This is a literal room of the base you need to add, so you’ll need to do this from the Command Center, just as you would any other new module.
You don’t have to worry about launching the base anymore for the rest of the game, so don’t worry if the Materializer module pushes you beyond the weight limit of your max organics capacity.
Once built, speak with the Scientist in your new module. The plan is to summon a path for you to get to the force field in the sky and disable it. This will be the most dangerous mission of the whole game, and the Scientist warns you to make sure you’re prepared before actually taking this task on.
The Scientist will tell you to craft a bunch of extra supplies to have on hand. Out of everything, all you need to worry about are extra suit batteries and anomaly shields. They aren’t necessary if you’re careful, but it’s good to have a couple of each just in case.
Whenever you’re ready, head to the spot on the map that the Scientist marked. Make sure you do this in the morning. The game will warn you before progressing that this is a bit of a point of no return, and you won’t be able to return to base for an unknown period of time. Don’t stress too much. I did this section twice and was home before noon on the same day both times.

Call the Scientist, and he’ll summon the Interal Tree. This structure looks daunting along with the intense music and constant radio messages from your team as the base is “falling apart,” but as long as you yourself survive, everything else will be fine.
As crazy as this all looks, it’s very straightforward. You just have to climb to the top of the tree, and it’s all completely linear. Follow all paths forward and upward. You won’t always be able to run by every anomaly, so take out any that are directly blocking your path. There are five or six points where you have to climb a wall to proceed. If the path ends, find the grapple spot and continue. Easy.

There is one Prism anomaly halfway up the tree. Just run through it and keep going. You don’t need to waste your time destroying it.
At the very top, you’ll enter a massive Prism that’s chock-full of aggressive anomalies everywhere. Taking out the Prism is mandatory here, but thankfully, its three weak points are incredibly easy to spot. You’ll likely have to kill a few random anomalies that get in your way, but you shouldn’t have too bad of a time here overall.

Once the Prism is destroyed, all the other anomalies go with it. Smack-dab in the center of the arena is a swirling, tornado-like structure. Use your crafting menu and place the Fragmenting Device directly below this mass.
The device will trigger automatically, and you need to high-tail it out of there before the whole tree disappears. Run to the edge of the tree branch just beyond the arena, and you’ll have a button prompt to repel down to safety. You’ll spawn back inside the airlock where the team is waiting with a toast of beer.
All that’s left for this objective is to regroup with the team in the Kitchen the next morning. Despite what you might think, dialogue options don’t matter here. Role-play it however you want to.
Final Preparations

It’s finally time to go home, and you’ve got some decisions to make. First things first. Go back to the beacon and switch it on. With the force field in the sky gone, the beacon will now actually summon the rescue team.

Top priority is getting the Scientist to work on researching the Ark Sarcophagus module. This will hide your alters from the rescue team, and takes four hours of research.
From here, you have options regarding how to deal with the rescue crew and piloting the ship. Choose which outcomes you like best, and get to work.
I recommend doing every available preparation task here. Regardless of which survival options you like best, you may feel differently in the moment as the final rescue takes place. Prepping everything in this phase before the rescue team arrives doesn’t lock you into any specific endings. It just gives you more choices to make in the endgame.

When the research is done, build the Ark Sarcophagus module for 30 metals and 40 rapidium. It takes up just as much space as a regular Rapidium Ark, but you should have room if your base is fully expanded. If not, just delete any extra rooms you have to make space. You don’t need them anymore.
If you’ve built every other possible module in the game to this point, creating the Ark Sarcophagus will earn you the Ultimate Builder trophy/achievement.
The Takeover
You need to figure out how you’re going to fly the rescue ship once you commandeer it. Sadly, there was never an option for a Pilot alter.
One option is to research the autopilot device once the Scientist is done focusing on the Ark Sarcophagus. This takes four hours, and then 10 metals, 10 minerals, and 20 organics to craft in the Workshop once it’s ready. You can stop here if you please, or work on a backup plan.

You’ll get a call from Lucas, who is willing to hijack and pilot the ship for you. That is, as long as you can craft him a RAT (remote access transmitter) first. This only costs 10 metals and 30 minerals, so you might as well.
Doing all of this opens up every available option for getting the ship off the ground during the final sequence.
The Rescue Team

Next, you’ll have to decide how you want to take care of the fully-armed rescue team that’s been deployed to take you home. The more peaceful option is to knock them out with sleeping gas during the journey. For this, the Scientist will need to research the Suit Mask Upgrade.
Once again, this takes four hours, and you’ll need to research the Ark Sarcophagus first. Once the research is done, you’ll also need to craft the mask in the Workshop for 30 metals, 30 minerals, and 20 organics.

You’ll also need to create the sleeping gas, which is automatically available in the Workshop for 10 minerals and 120 organics.

The other option is to simply blow up the rescue team as they’re exploring the base. For this, you need to head back to the Workshop once again and craft four explosive charges. Each one costs 10 metals and 40 organics.
Once you have them all, you’ll need to place them in four separate rooms throughout the base—the Airlock, Command Center, Machinery, and Quantum Computer. That’s it. You’re finally ready.
If you have any days to spare, I’d recommend sleeping before choosing to summon the rescue team at the Command Center. This way, you’ll always have a save file at the start of your final day if you want/need to try out any other endings.

Before all your alters head into cryosleep in the Ark Sarcophagus, take a second to say goodbye to them all, just in case you don’t actually get to see them again.
Take one last phone call in the Comms Room from your overlord of choice, and you’ll soon be on your way.
Jan Dolski’s Return – FInal Decisions

The rescue team is outside, so don’t keep them waiting. Interact with the Airlock to meet them on the surface and lock yourself into the final scene of The Alters.

Once again, role-play the first bit however you please until one of the soldiers notices some weird readings in one of the Rapidium Arks. You’ll have to talk your way out of this one. If you have any dialogue options from your learned life lessons here, now’s the time to deploy them.
If you choose responses that make the soldiers too suspicious, you’ll blow your alters’ cover. Focus on responses that are compliant and drive home the point that Ally Corps can check out the Arks themselves whenever you get back to Earth. Now is the time to get a move on before the sun fries you to a crisp.
The lead rescue agent will eventually agree, and they’ll all board the base just to make sure everything else is on the up-and-up.
Here’s where all your preparations come into play. You’ll need to choose whether you want to use the sleeping gas, blow up the base, or simply do nothing.
Next, you’ll choose whether Lucas hacks the ship and pilots it himself, or whether you use the autopilot device to keep Lucas’ hands clean.
Ultimately, these are your choices. There’s really no “good” or “happy” ending here, they’re all just a little different. Play it out how you want to.
For what it’s worth, I will tell you that “doing nothing” will result in a conclusion that’s concerning for your alters. Since you didn’t do anything to take the ship over, you’ll now land on Earth and directly turn the alters over to Ally Corp.
If you want to give the alters the best shot at a normal life, choose either the sleeping gas or the explosives.

After a very brief Epilogue, the credits will roll. From here, you’ll need to decide if you’re satisfied with your ending, or if you want to reload your final day to try something else.
Act 3 – Additional Objectives

As with all the other acts, you’ll once again have some side activities pop up along the way in Act 3. Honestly, none of these are super important for survival since you’re almost home-free anyway, but several will wrap up the storyline of an alter and reward you with a trophy/achievement.
If you’re only going to focus on one thing below (besides managing low alter morale), focus on The Meaning of Life. This leads to a conclusion to the Scientist’s story that is honestly cooler and more interesting than the actual endings of the game itself.
Low Morale

If you’re like me, you’re going to have an unhappy squad in the wake of the rebels splitting off from your group. The Low Morale side objective can pop up at any point in the game, but Act 3 is where it came into play for me.
It’s a simple goal, but you’ll need to be intentional about your solution. You just need to improve the moods of your alters within five days, or else something bad might happen. This can even lead to the death of an alter or two, so take this seriously.
Seek out your most unhappy alters, and speak with them if you can. Lots of times, they’ll give you clues as to why they’re so upset.
For example, the Scientist told me that he was sick and tired of becoming irradiated every day. I saw that this was happening and was giving him time in the Infirmary to heal each time, but I still didn’t know why it kept happening. Turns out, I had let the base run out of radiation filters, so everyone was suffering radiation burns daily as a result. Whoops.
Fix any pressing issues like this, consider limiting/omitting crunch work hours for a while, throw a feast, play some beer pong, or watch a movie. However, you can go out of your way to make everyone happy, do it before it’s too late.
Imagine Sisyphus Happy
The Doctor misses the tattoo of Sisyphus that he used to have on his forearm. You might be able to get him a new one.
First, you’ll need an artist. Ask everyone about their artistic skills, then report back to the Doctor and suggest an alter to come up with the tattoo design.

Next, the Tattoo Machine will now be available in the Workshop. Craft it with 5 metals and 10 minerals. Once it’s ready, install and use it in the Infirmary.
You’ll get a nice little cutscene, as well as a shiny trophy/achievement for finishing the Doctor’s storyline.
Saving Ben

The Refiner is still worried about this timeline’s version of his partner, Ben. What if the same accident happens again, and he gets killed?
You’ll only get this objective if you chose Lena’s brain implants as your cure.

Check with Lena to see if she can give an anonymous tip about the poor conditions of Ben’s workplace. She’ll reluctantly agree, then call you back later.
She wasn’t able to give an anonymous tip to the company itself, but she went out of her way to contact Ben and warn him of the impending danger.
Tell the Refiner that his request saved Ben, and you’ll get the trophy for finishing this storyline too.
If you chose Maxwell’s Tabula Rasa brain-harvesting cure, Ben will unfortunately be killed in an explosion. Lucas will call to break the news to you, and then it’s on you to decide if you tell the Refiner or not.
The Meaning Of Life

During the Final Preparations phase of the act, the Scientist will approach you about exploring the planet alone. He thinks he may have located a massive scientific discovery. He’ll need to go away for a day, and also requires 10 polymers for his expedition.
Agree to this, and make his polymers in the Refinery for the cost of 20 minerals and 20 organics. When he’s done researching the Ark Sarcophagus, Autopilot Device, and/or Suit Mask Upgrade, give him the polymers, and tell him he’s free to go explore. He’ll be gone for a full 24 hours, so make sure you’re able to spare him for that long.
After a day, the Scientist returns and tells you that he found the “planet’s secret.” He’ll mark it on your map, so go check it out. Cross the bridge he left behind, and continue on the only path forward.
You’ll end up at a Garden Of Eden-type oasis in the middle of nowhere. Take a call from the Scientist while you’re there, then head back to speak with him in person.

He’ll ask you if you’re okay with him staying behind on the planet to research the oasis since it’s somehow safe from the radiation of the planet. It’s sad, but you should let him go. Whenever you’re ready in the next three days, speak with him again and tell him he’s free to leave. After your goodbye, he’s gone forever, and you’ll have another trophy for completing an alter’s storyline.
Act 3 Tips

Act 3 easily has the most to juggle in The Alters, while also being the most punishing section of the map. Here are some extra things to keep in mind to aid your survival.
- Automate Your Outposts: It’ll cost a planetary sample or two, but researching and then building automatic outposts is a game-changer. Their use is exactly what it sounds like—these mining outposts work on their own, so the alter you used to have assigned to its location is now free to do something else. I put auto-outposts on every resource mine in Act 3, which gave me amazing flexibility to handle everything else.
- Prepare for Magnetic Storms: Storms in Act 3 are much more frequent, so you’re going to need a lot of repair kits. I got to the point where I’d have eight or so in storage at all times just in case. Think about adding four Radiation Repulsor modules and researching radiation room shields to combat these harsh elements too.
- Prioritize Getting The Rebels Back ASAP: It’s no secret that many hands make lighter work. Right when you can get outside, consider booking it to the rebel’s base immediately to get whoever you can back on your side. In one playthrough, I went through most of Act 3 with just two alters, and it was brutal. Don’t be like me.
- Keep Every Option Open: I touched on this above, but it’s smart to prepare both ending sequence options just so you have the choice in the moment for how to conclude the game. Once again, be sure to sleep before launching into the final day from the Command Center so you have a nice, tidy save file to retry from if you end up needing it.
Cargo Locations
The cargo in Act 3 is slightly less important since all the Damaged Chips have already been found by the end of Act 2. Still, it’s always nice to find a new movie or a personal object to boost someone’s mood.
In the pictures above, you’ll see a map location, immediately followed by the loot you’ll find at that spot. Happy hunting.

Next
The Alters: Best Alters To Choose & Best Order
So many branches, so little time…

The Alters
- Released
-
June 13, 2025
- ESRB
-
m
- Engine
-
Unreal Engine 5
- PC Release Date
-
June 13, 2025
- Xbox Series X|S Release Date
-
June 13, 2025